BlockID Flutter SDK Integration Guide
Overview
Flutter is an open-source UI software development kit created by Google. It is designed to build natively compiled applications for mobile, web, and desktop from a single codebase. It uses the Dart programming language and provides a rich set of pre-designed widgets and tools that allow developers to create highly customizable, expressive, and fast-performing interfaces.
The BlockID SDK is a cross-platform dependency compatible with both Android and iOS. It can be effortlessly integrated into native Android applications using Gradle as the dependency management tool, while iOS applications can incorporate it using CocoaPods.
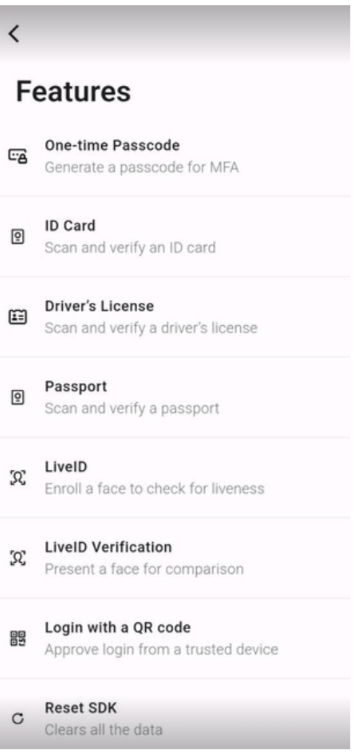
Here are the key features of the BlockID SDK:
-
One-Time Passcode: Generate a one-time passcode displayed in a mobile app, providing an additional Multi-Factor Authentication (MFA) layer.
-
ID Card Verification: Scan, extract, and verify ID cards from a specified list of countries.
-
Driver’s License Verification: Scan, extract, and verify driver’s licenses from a specified list of countries.
-
Passport Verification: Scan, extract, and verify passports from a specified list of countries.
-
Live ID Enrollment: Allow users to enroll their face for liveness detection.
-
Live ID Verification: Prompt users to verify their face against a previously enrolled image for identity confirmation.
-
Passwordless Login: Utilize a QR code for secure login approval via a trusted device.
-
Enroll TouchID / FaceID: Leverage the native biometric of the device to unlock the application.

-
License Key Management: Use a license key to manage the blockidplugin efficiently. The following screenshot illustrates the features of BlockID SDK:
Starting with Release v1.10.70, the BlockID SDK has been integrated with the Flutter framework through a plugin/bridge. This plugin serves as a wrapper for the native BlockID SDKs on iOS and Android, facilitating interaction with the SDKs across both platforms so that the BlockID services can be seamlessly used on Android/iOS applications built with Flutter.
System Requirements
Before getting started, make sure you meet the following prerequisites:
- Ensure that the Flutter development environment is set up on your system.
- Android API level 26 / Android OS 8 or higher is required.
- iOS version 15.0 or later is necessary.
Integrating blockidplugin with Flutter Project
To seamlessly incorporate the flutter_blockidplugin into your Flutter project, follow these steps:
-
Create your flutter project. For example,
flutter create name_of_the_project. -
Open the pubspec.yaml file and add the following dependencies.
flutter_blockidplugin:
  Git:
  url: https://github.com/1KBlockID/flutter-blockid-demo-app
ref: main -
After including the dependency, run the
flutter pub getcommand in the terminal.
Managing Configurations in iOS/Android Platforms
To use Android/iOS Flutter applications, you must configure specific dependencies into your Flutter project's Android/iOS directories.
Configuring iOS Directory
Make the following changes to the Podfile in the iOS directory of your Flutter project.
Check if you already have a Podfile in the iOS directory. If not, run the pod initcommand in the terminal. This command will initialize a Podfile for your project.
-
Open the Podfile in the text editor of your choice.
-
Add the supported iOS version in the pod file header as shown below.
platform :ios, '15.0' -
Add the following dependencies inside the target block.
pod 'BlockID', :git => 'https://github.com/1KBlockID/ios-blockidsdk.git', :tag => '1.20.50' -
Add the following configuration to the Podfile.
post_install do |installer|
  installer.pods_project.targets.each do |target|
    flutter_additional_ios_build_settings(target)
    target.build_configurations.each do |config|
       # set build active architecture to to YES
    config.build_settings['ONLY_ACTIVE_ARCH'] = 'YES'

   # set build library for distribution to true
    config.build_settings['BUILD_LIBRARY_FOR_DISTRIBUTION'] = 'YES'

   # enable simulator support
    config.build_settings["EXCLUDED_ARCHS[sdk=iphonesimulator*]"] = "arm64 i386"

    # set iOS Deployment Target to 15.0
    config.build_settings['IPHONEOS_DEPLOYMENT_TARGET'] = '15.0'

    config.build_settings['GCC_PREPROCESSOR_DEFINITIONS'] ||= [
      'PERMISSION_CAMERA=1'
    ]
    xcconfig_path = config.base_configuration_reference.real_path
    xcconfig = File.read(xcconfig_path)
    xcconfig_mod = xcconfig.gsub(/DT_TOOLCHAIN_DIR/, "TOOLCHAIN_DIR")
    File.open(xcconfig_path, "w") \{ |file| file \<< xcconfig_mod }
  end
  end
end
- Save the
Podfileand run thepod installcommand to install the specified pods.
Configuring Android Directory
To configure the files inside the Android directory of your flutter project, follow these steps:
Step1: Adding Repositories
Navigate to the <project>/android/app/build.gradle file and make the following changes under the allprojects > repositories section.
gradlePluginPortal()
        maven   {
            url 'https://nexus-1k-nonprod.1kosmos.net/repository/maven-releases/'
            credentials {
                username = "developer"
                password = "q5k#06ZcjSo#"
            }
        }
        maven {   url "https://jitpack.io"  }
        maven {
            url  'http://www.baka.sk/maven2'
            allowInsecureProtocol = true
        }
Step 2: Modify the Gradle build configurations
-
Specify the
minSdkVersionproperty as 26. -
Add the following packaging options inside the Android section.
packagingOptions {
 exclude 'META-INF/rxjava.properties'
 exclude 'lib/x86_64/darwin/libscrypt.dylib'
 exclude 'lib/x86_64/freebsd/libscrypt.so'
 exclude 'lib/x86_64/linux/libscrypt.so'
 exclude 'META-INF/INDEX.LIST'
 exclude 'META-INF/LICENSE.md'
 exclude 'META-INF/DEPENDENCIES'
 exclude 'META-INF/NOTICE.md'
 exclude 'AndroidManifest.xml'
} -
Add the following configurations to the root level of the build.gradle file.
configurations.configureEach {
exclude group: 'org.bouncycastle', module: 'bcprov-jdk15to18'
exclude group: 'org.bouncycastle', module: 'bcutil-jdk15on'
}
Step 3: Add Permissions to the AndroidManifest.xml file.
The BlockID SDK requires the following permissions. Add them to your AndroidManifest.xml file by navigating to the [project]/android/app/src/debug folder.
<manifest xmlns:android="http://schemas.android.com/apk/res/android"
    xmlns:tools="http://schemas.android.com/tools">
    <!-- The INTERNET permission is required for development. Specifically,
         the Flutter tool needs it to communicate with the running application
         to allow setting breakpoints, to provide hot reload, etc.
    -->
    <uses-permission android:name="android.permission.INTERNET"/>
    <application
        android:label="appname"
        android:icon="@mipmap/ic_launcher"
        android:theme="@style/LaunchTheme"
        android:allowBackup="true"
        tools:replace="android:allowBackup,android:theme,android:label"/>
</manifest>
Step 4: Run the flutter project.
Importing flutter_blockidplugin to your Project
To seamlessly use the BlockID app's functionality, run the following command to import the blockidplugin into your Flutter project.
import 'package:flutter_blockidplugin/index.dart';
Sample
final _blockidpluginPlugin = Blockidplugin();
await _blockidpluginPlugin.setLicenseKey(YOUR_KEY);
Managing Functionalities in the Sample Project
After creating the sample project, the following BlockID app functionalities can be explored in the Flutter Android/iOS applications:
- SDK Setup functions
- Get DID
- Get Version
- Biometric Enrollment
- Biometric Verification
- Create a one-time passcode
- LiveID Enrollment
- LiveID Verification
- Document Enrollment
- Login with a QR Code
- Locking and Unlocking SDK
- Resetting SDK
SDK Setup functions
You can set up an SDK to manage the license key, wallet, and tenant. The following table provides information on various SDK functions:
| Function | Description | Container |
|---|---|---|
| Set License Key | Set the license key to access the blockidplugin | await _blockidpluginPlugin.setLicenseKey(const_licenseKey); |
| Initialize Wallet | Create a wallet for the application | final status = await _blockidpluginPlugin.initiateTempWallet(); |
| Register Tenant | Register the tenant with the SDK | final status = await _blockidpluginPlugin.registerTenant(const_tag, const_community, const_dns,); |
Get DID
To retrieve the unique Distributed IDentifier (DID), run the following command. Its response is displayed as a String.
final _blockidpluginPlugin = Blockidplugin();
final response = await _blockidpluginPlugin.getDID();
Get Version
To retrieve the version of the currently used BlockID SDK, run the following command.
final _blockidpluginPlugin = Blockidplugin();
final response = await _blockidpluginPlugin.blockIDSDKVersion();
Biometric Details
Use this functionality to scan your biometric data to unlock the BlockID SDK and gain access to its functionality.
To enroll a biometric, run the following command:
final status = await _blockidpluginPlugin.enrollDeviceAuth();
To verify if any biometric data has already been enrolled, run the following command:
final status = await _blockidpluginPlugin.verifyDeviceAuth();
To check if the biometric has been registered, run the following command:
final status = await _blockidpluginPlugin.isDeviceAuthRegistered();
One-time passcode
Obtain the time-based OTP from the blockidplugin by running the following command:
final _blockidpluginPlugin = Blockidplugin();
final response = await _blockidpluginPlugin.totp();
Its response will be of the type TOTP and provide the following objects:
| totp | Displays a time-based one-time password (OTP). |
|---|---|
| getRemainingSecs | Displays the time after which the OTP expires. The default expiry time of the OTP is 30 seconds. |
LiveID Enrollment
You can perform the following functions during the enrollment of liveID:
a. Enroll LiveID – Use the following command to enroll the liveid.
await _blockidpluginPlugin.enrollLiveIDScanning(
        scannerViewId,
        dvcID: const_dvcID, // this param is optional, can be omitted
        mobileSessionId: random_UUID, // optional param
        mobileDocumentId: "liveid_$random_UUID"); // optional param
Method Summary
| scannerViewId String | The view provided by the application, used for UI customization |
|---|---|
| dvcID | (Optional) String: DvcID |
| mobileSessionId | (Optional)String: random ID |
| mobileDocumentId | (Optional) String: random ID |
b. Verify Enrolled LiveID – Use the following command to verify the enrolled liveID.
await _blockidpluginPlugin.verifyLiveIDScanning(
        scannerViewId,
        dvcID: const_dvcID, // this param is optional, can be omitted
        mobileSessionId: random_UUID, // optional param
        mobileDocumentId: "liveid_$random_UUID"); // optional param
Method Summary
| scannerViewId | String: View provided by the application, used for UI customization |
|---|---|
| dvcID | (Optional) String: DvcID |
| mobileSessionId | (Optional) String: random ID |
| mobileDocumentId | (Optional) String: random ID |
c. Check if LiveID is registered – Use the following sample command to check if the liveID has been registered.
final status = await _blockidpluginPlugin.isLiveIDRegistered();
The status will be a boolean value indicating whether the LiveID is registered.
d. Stop LiveID Scanning – Use the following sample command to stop the liveID scanning process.
final status = await _blockidpluginPlugin.stopLiveIDScanning();
The status will be a boolean value indicating whether scanning has been stopped.
e. LiveID Scanning responses – Displays the responses of the liveID scanning.
| FocusOnFaceChanged | When the user’s face focus changes within the scanner focus area. |
|---|---|
| faceLivenessCheckStarted | When the LiveID scanner started the liveness check. |
| completed | When the LiveID Scanning is completed. |
| failed | When the LiveID Scanning fails. This will give the error object as follows: Error: ErrorResponse which will have the code. Error Code Description: Error Description. |
Document Enrollment
You can use this functionality to enroll different types of documents such as Driver’s Licenses, Passports, and National IDs.
a. Scanning document – Use the following command to scan the document.
final documentStr = await _blockidpluginPlugin.scanDocument(type);
Where the documentStr provides a JSON string containing document information, and its types are listed below:
| nationalID | National ID |
|---|---|
| drivingLicense | Driver License |
| passport | Passport |
b. Registering Document – Use the following sample command to register the document.
// This will register Drivers License with LiveID
final status =
          await _blockidpluginPlugin.registerDrivingLicenceWithLiveID(response,
              mobileSessionId: generatedUUID,
              mobileDocumentId: "dl_with_liveid_$generatedUUID");

// This will register Passport with LiveID
      final status = await _blockidpluginPlugin.registerPassportWithLiveID(
          response,
          mobileSessionId: generatedUUID,
          mobileDocumentId: "ppt_with_liveid_$generatedUUID");
// This will register National ID with LiveID
final status = await _blockidpluginPlugin.registerNationalIDWithLiveID(
          response,
          mobileSessionId: generatedUUID,
          mobileDocumentId: "nationalid_with_liveid_$generatedUUID");
Method Summary
| response | Type: DocumentScannerResponse |
|---|---|
| mobileSessionId | (Optional) String: random ID |
| mobileDocumentId | (Optional) String: random ID |
The response from the document scan is of type DocumentScannerResponse, which is a struct containing the following objects:
obj: A hashmap that holds details about the document information.face: A Base64-encoded string representing the facial image found on the document.proofedBy: A string indicating the proofing entity, such as BlockID.
QR Scanning
The following functions help with QR scanning.
a. Start Scan - To start the scanning process, use the following command:
final qrDataString = await _blockidpluginPlugin.startQRScanning(
scannerViewId,
);
Method Summary
| scannerViewId | String: View provided by the application, used for UI customization |
|---|---|
| return | qrDataString: Scanned data as String |
b. Stop Scan - To stop the scanning process, use the following command:
await _blockidpluginPlugin.stopQRScanning();
Method Summary
| return | Boolean: It will return true if the scanning process is stopped. |
|---|
Locking and Unlocking SDK
The lock and unlock functionality in the SDK provides control over feature access, ensuring that SDK capabilities are only accessible when explicitly unlocked.
By default, the BlockID SDK is locked. To access its functionalities, you must first unlock the SDK. You can unlock it using one of the following methods:
- Scan your Biometric data to unlock the SDK. For more information, see Biometric Enrollment.
- Alternatively, use the unlock functionality to gain access and continue using BlockID features.
To lock the SDK, run the following command:
await _blockidpluginPlugin.lockSDK();
To unlock the SDK, run the following command:
await _blockidpluginPlugin.unLockSDK();
Resetting SDK
Use this function to purge the SDK wallet and remove all data stored or owned by the SDK.
To reset the SDK, run the following sample command:
await _blockidpluginPlugin.resetSDK(
        AppConstants.tag,
        AppConstants.community,
        AppConstants.dns,
        AppConstants.licenseKey,
      );
Here, the parameters passed to the function are predefined and should be included in the app as configuration properties.
Frequently Asked Questions
Q. Can I remove the LiveID option from SDK?
A. No, you cannot remove the LiveID option. To remove it, contact our support team.
Q. What should I do if I do not have the pod file in the iOS directory?
A. You can run the pod init command in the terminal. This command will initialize a Podfile for your project.
Q. How do I seek the version of the BlockID SDK?
A. You can use the getSDKVersion() function in your dart class, as shown below, to retrieve the version of BlockID SDK.
Future<void> getSDKVersion() async {
String response = "";
try {
final String result = await methodChannel.invokeMethod('getSDKVersion');
response = result;
} on PlatformException catch (e) {
response = "Failed to Invoke: '${e.message}'.";
}
setState(() {
_sdkVersion = response;
});
}